ICS4U – Designing a Finger Counting Game
ICS4U Learning Goals
In this ICS4U Grade 12 Computer Science lesson you will be learning how to
- Create a software project plan
- Execute a software project plan
- Review and reflect on a larger software project
- Practice Good Time Management in developing a software project
Creating a Software Plan
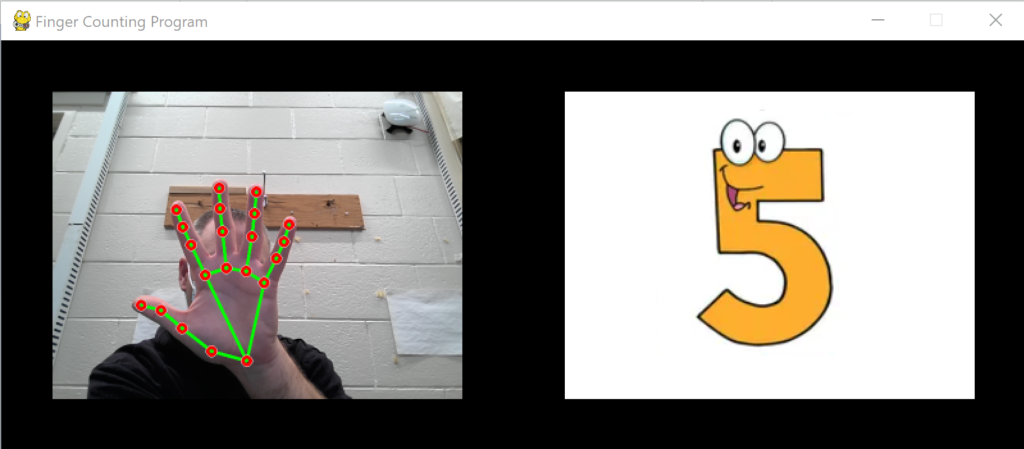
I am not a expert on Computer Vision (Nor are you required to be), but did make a little project that you can try out, that isn’t too complex. You need a webcam to be able to run this project. My project focuses on using computer vision to count how many fingers I’m holding up with my right hand in real Time. To accomplish this task I am using a combination of OpenCV, a google algorithm called mediapipe, and pygame to display everything to the screen.
Mediapipe
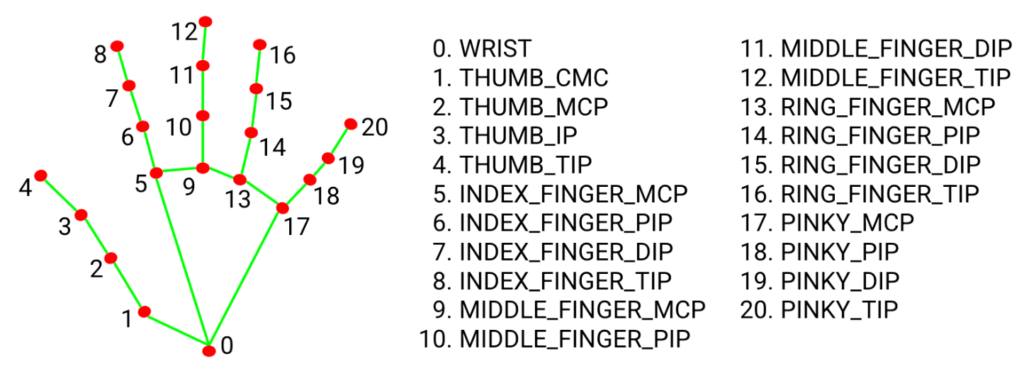
Mediapipe is hand detection model that uses a set of pretrained Tensorflow algorithms that can can be used to detect 21 different points of a hand
Interface
Since we have been using Pygame for some of our projects, I will stick with it for the Graphical Interface of my Project
The Interface has a size of 800 x 320 with each window inside it being 320 x 240. That gives a 40 pixel border around the outside
Objects
There will be two objects needed for the pygame interface
- The first will be an object that displays the webcam caputure and overlay of the Mediapipe landmarks
- The second will be an object that displays the image representing the number of fingers held up
In addition to those, i will also need to create a Webcam Object using OpenCV and a Hand Detector Object that processes the image from the webcam and finds the landmarks, and a single Room to hold them all
Images
I found some free stock images of numbers and made them into 320 x 240 images files
Those files are stored in a folder called Fingers with filenames: FingerImage0.png, FingerImage1.png, etc… The number at the end corresponds to the counted fingers.

Python Packages
You will need to install some additional python packages in order to make this project work
- Numpy – Numerical Python – An effecient way to handle multi dimensional arrays of data produced by openCV images
- OpenCV – The image processing package
- Mediapipe – Google’s Hand Detection Model
They can be installed the same way that you installed pygame using PIP
Windows -> Any Installation -> Search for “cmd” in the Windows Search Bar and it will open up a terminal. Install all 3 packages
- py -m pip install numpy
- py -m pip install opencv-python
- py -m pip install mediapipe
Mac -> Any Installation -> Press the “Command” button and the space bar, simultaneously then search for “Terminal”. Install all 3 packages
- pip install numpy
- pip install opencv-python
- pip install mediapipe
Interface Setup
The following code will get the main user interface up and running with pygame
					#Computer Vision Imports
import cv2
import mediapipe as mp
import numpy as np

#Pygame Imports for Interface
import pygame
from pygameRogers import Game
from pygameRogers import Room
from pygameRogers import GameObject

#Game Screen
g = Game(800,320)

#Visual Resources
BLACK = (0,0,0)
simpleBackground = g.makeBackground(BLACK)
fingerPics = []
for i in range(0,6):
	fingerPics.append(g.makeSpriteImage("Fingers/FingerImage"+str(i)+".png"))

#Hand Detector Object using Mediapipe
class HandDetector:

	def __init__(self):

		pass

	def findHandLandmarks(self,img):

		pass

	def drawHandLandmarks(self,img):

		pass

#Object to Display the Video Capture and Hand Landmarks
class Capture(GameObject):
	def __init__(self, xPos, yPos):
		GameObject.__init__(self)
		self.rect.x = xPos
		self.rect.y = yPos

	def update(self):

		pass

#Object to Display the correct Finger Image
class Fingers(GameObject):
	def __init__(self, xPos, yPos):
		GameObject.__init__(self)
		self.rect.x = xPos
		self.rect.y = yPos


	def update(self):

		pass

#Room
r1 = Room("Finger Counting Program",simpleBackground)
g.addRoom(r1)

#Creating the Visual Objects and adding to them to the Room
captureWindow = Capture(40,40)
fingerWindow = Fingers(440,40)
r1.addObject(captureWindow)
r1.addObject(fingerWindow)

# Start Pygame Window
g.start()
while g.running:

	#How often the game loop executes each second
	dt = g.clock.tick(60)

	# Check Pygame Events
	for event in pygame.event.get():

		# Check for [x]
		if event.type == pygame.QUIT:
			g.stop()

	# Update All objects in Room
	g.currentRoom().updateObjects()

	# Render Background to the game surface
	g.currentRoom().renderBackground(g)

	# Render Objects to the game surface
	g.currentRoom().renderObjects(g)

	# Draw everything on the screen
	pygame.display.flip()


pygame.quit()
You can run the code above, but you won’t see the two windows with the webcam image or the finger counting yet.
Loading the Webcam Image
The next step is to get the image capture from your webcam. The number that goes inside the VideoCapture Function is the ID of the webcam. If you only have 1 webcam hooked up then you probably want to use 0. I am using a laptop, so I have a rear and front facing cameras,so mine have ID values of 0 and 1. My front facing is the 0. Some trial and error might be needed.
You don’t need to set the capture resolution, you could leave it as default, or set it to an HD resolution 1920 x 1080 or 1280 x 720. Smaller resolutions have less data and will process faster, so I didn’t think i needed anything more then SD resolution
The webcam can be a global object, so this code can be placed underneath where you created the capture window and before you start the Pygame Loop
					#Create an OPENCV videoStream using my webcam at at a specified resolution
webCam = cv2.VideoCapture(0)
webCam.set(cv2.CAP_PROP_FRAME_WIDTH, 640)
webCam.set(cv2.CAP_PROP_FRAME_HEIGHT, 480)
On some webcams, on Windows, I have had to explicitly set the type of capture when creating the Video Capture Object. (I didn’t need to using the built in webcam on my laptop, but whenever I plugged in an external USB camera I did have to specify)
					#Create an OPENCV videoStream using my webcam at at a specified resolution
webCam = cv2.VideoCapture(0,cv2.CAP_DSHOW)
Now that you have a link to your webcam, we need to display the image from the webcam onto the Pygame object we setup. A new image needs to be updated every frame. So this code will go in the update function of the Video Capture Class.
					#Video Capture Class Update Function
def update(self):

	# Get the current frame from the webcam and store as a numpy array (frame) (success could be used to check for valid stream)
	success, frame = webCam.read()

	# Process the frame so its the correct size, orientation, colorspace for pygame
	frame = cv2.resize(frame, (320, 240))
	frame = np.rot90(frame)
	frame = cv2.cvtColor(frame, cv2.COLOR_BGR2RGB)

	# Make a pygame Surface from that webcam data and set the image
	self.image = pygame.surfarray.make_surface(frame)
Important Information about the Function:
- The read function returns 2 pieces of information. A true or false if the read was successfull or not, and then a numpy array of numbers which represent the digital information of the image
- The data array for the image is the size of the webcam resolution. You could check that by printing frame.shape right after you execute the read function.
- My display window is smaller then my capture resolution, so I need resize the image
- The default orientation of the image is sideways, so it needs to be rotated
- OpenCV uses a different color space then Pygame. It uses BGR instead of RGB (They switch the order of the Blue and Red values in the color TUPLES) so you need to covert or it looks weird
- The last thing that happens is we need to make that numpy data array compatible with pygame. Pygame draws on surfaces, so there is function that converts a numpy array to a surface
ICS4U Interactive Learning Activity - Grade 12 Computer Science
Take the interface setup code and add
- Code to create the webcam object
- Update Code for the Video Capture Object
The Hand Detection Object
We need to make a hand detector object in the same spot as we made the webcam object. No other information is needed for its constructor
					#Create a hand detector object
detector = HandDetector()
Hand Detector Constructor
The most important field in the constructor for our purposes is the lmList list. It will store the locations of the 21 landmarks Mediapipe returns
					#Hand Detector Constructor
def __init__(self):

		#Initialize important mediapipe data
		self.mpHands = mp.solutions.hands
		self.hands = self.mpHands.Hands()
		self.mpDraw = mp.solutions.drawing_utils

		# The hand object detected in the image
		self.theHand = None

		#A list store store all the landmarks: https://google.github.io/mediapipe/solutions/hands.html
		self.lmList = []
Finding the Landmarks on the Hand:
This function makes a 2D list of the landmark number and its (x,y) position in the window.
- That list is called lmList.
- It is a field of the Object, so we can use its data in our program.
- Each row is a list [landmark #, x, y].
- Most of the code is just parsing the data sent back from mediapipe to get the information we need in a nice organized way.
					#Finding the landmarks on the hand
def findHandLandmarks(self,img):

	#Process the numpy img array
	self.results = self.hands.process(img)
	self.lmList = []

	#Find the hand (Possible to find multiple hands, i'm only finding the first)
	if self.results.multi_hand_landmarks != None:
		self.theHand = self.results.multi_hand_landmarks[0]
	else:
		self.theHand = None

	#If there is a hand in the image, then find the landmarks and store in lmList
	if self.theHand != None:

		#Find the locations of all the landmarks
		for i in range(0,len(self.theHand.landmark)):

			#Get the landmark data
			lm = self.theHand.landmark[i]

			#Find the pixel closet to the landmark and store its location in list
			pixelX = int(lm.x * img.shape[1])
			pixelY = int(lm.y * img.shape[0])
			self.lmList.append([i, pixelX, pixelY])
Drawing the Landmarks on the Hand
This function just draws dots on the landmarks and the connecting lines between the landmarks.
- You can edit the color, size of the dots, and how much of them are filled.
- You can also adjust the color and thickness of the connections
					#Function to Draw the Landmarks
def drawHandLandmarks(self,img):

	if self.theHand != None:
		pointDrawSpec = self.mpDraw.DrawingSpec(color=(0, 0, 255), thickness = 4, circle_radius=6)
		connectionDrawSpec = self.mpDraw.DrawingSpec(color=(0, 255, 0), thickness=4)
		self.mpDraw.draw_landmarks(img, self.theHand, self.mpHands.HAND_CONNECTIONS, pointDrawSpec, connectionDrawSpec)

	return img
Now where do we use these functions? Well, you need to aquire the new landmarks every frame, so we need to call both those functions in the update function for the video capture object.
					#Modified Update Function For Video Capture
def update(self):

	#Get the current frame from the webcam and store as a numpy array (frame) (success could be used to check for valid stream)
	success, frame = webCam.read()

	#Detect a hand and find the landmarks
	detector.findHandLandmarks(frame)

	#Draw the landmarks on the frame
	frame = detector.drawHandLandmarks(frame)

	#Process the frame so its the correct size, orientation, colorspace for pygame
	frame = cv2.resize(frame, (320, 240))
	frame = np.rot90(frame)
	frame = cv2.cvtColor(frame, cv2.COLOR_BGR2RGB)

	#Make a pygame Surface from that webcam data and set the image
	self.image  = pygame.surfarray.make_surface(frame)
ICS4U Interactive Learning Activity - Grade 12 Computer Science
Add the above code to your program. When you run your program, you should be able to see the program detect your hand, and draw the landmarks on top of the image.
Finger Counting
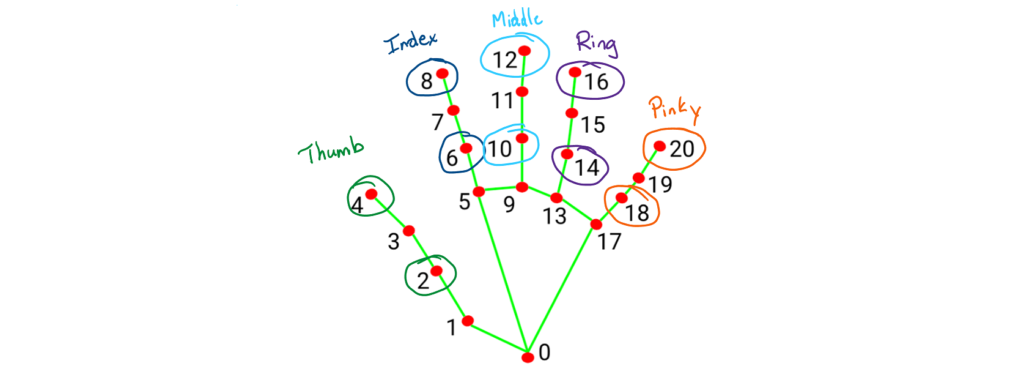
Looking at the picture below and thinking about how we bend our fingers up and down, we can determine if the fingers are up based on comparing two landmarks
- Index Finger Up if landmark 8 is above landmark 6
- Middle Finger Up if landmark 12 is above landmark 10
- Ring Finger Up if landmark 16 is above landmark 14
- Pinking Finger Up if landmark 20 is above landmark 18
- Thumb is Up if landmark 4 is left of landmark 2
We will need to know the orientation / coordinate system of the landmarks to determine this (Which was is positive / negative) on the landmarks
Let’s look at the Index finger landmarks.
- If I were to print(detector.lmList[8][2]) and print(detector.lmList[6][2]) [The 8 for landmark 8 and the 2 for the y coordinate) I would notice that when my finger is up landmark 8’s y value is less than landmark 6’s y value.
- However if we look at the Thumb landmarks and print(detector.lmList[4][1]) and print(detector.lmList[2][1]) [The 4 for landmark 4 and the 1 for the x coordinate] you notice that when my thumb is out landmark 4’s x value is larger than landmark 2’s x value. That’s kind of opposite to what I would expect based on normal computer coordinates.
					#Update Function for Fingers Class
def update(self):

	#Determine if a finger was up / down using landmarks

	#Count how many fingers are up

    #Set the image to the correct picture
	self.image  = #Image
ICS4U Interactive Learning Activity - Grade 12 Computer Science
Complete the update function for the Finger Class.
When that is complete, you should have a working project.
- Test your program to see how it works
- What are some of the limitations for the program?